Beekeeping
Bush Bees Home
Queen Rearing
Breeding From Best
Importance of Selection
Conditions for Queen-Rearing
In Hive With Laying Queen
Time to Start Nuclei
Bees Do Not Prefer Too Old Larvae
Placing Queen-Cells
Stapling Cells on Comb
Making Bees Stay in Nuclei
Looking for Eggs
Keeping Best Queen in Nucleus
Starting Brood for Cells
Brood for Queen-Cells
Trimming the Breeding-Comb
Bees Using Young Larvae Only
Age of Larvae for Queens
Placing the Breeding-Comb
More Than One Nucleus in Hive
Nucleus-Hive
Large Space for Middle Frame
Contents of Nucleus-Hive
Making the Bees Stay
Baby Nuclei
Regular Hives for Nuclei
Queen-Cage
Distributing Queen-Cells
Brushing Bees Off Queen-Cells
Advantage of Caging Cells
Appearance of Vacated Cells
Miller Queen Nursery
Pros and Cons of a Queen Nursery
Quality of Queens
Beginner Improving Stock
Click on Thumbnails for bigger pictures
Books for sale
Speaking
Be a patron on Locals
My YouTube Channel
Donations
Beekeeping Apprentice needed
Beekeeping Equipment
Beekeeping Carts
Beekeeping Things I Did Not Invent
Foundationless Beekeeping
Hardware Cloth Uses in Beekeeping
Hive Box Jig
Horizontal Hive Beekeeping
Lighter Beekeeping Equipment
Miscellaneous Beekeeping Equipment
Narrow Frame Beekeeping
Nucleus Hives
Observation Hives
Top Bar Hive Beekeeping
Top Entrance
Two Queen Hive
Wax Dipping Hives
Beekeeping Information
Beekeeping Acronym Glossary
Beekeeping Basics
Beekeeping Fallacies
Beekeeping Math
Beekeeping Locality
Beekeeping Systems
Beekeeping Terminology
Beginner Beekeepers
Classic Beekeeping Books
Colony Decisions
Contrary Opinions
Differences in Observations on Beekeeping
Experiment in Swarm Control
Feeding Bees
Frequently Asked Beekeeping Questions
Forums, how to get a good response
Harvesting Honey
Health Certificates since 2004
Inspections
Installing Packages
Laying Workers
Lazy Beekeeping
Mites that live on bees
More Than Just Bees
Moving Bees
Organic Beekeeping Meetings
Panacea
Presentations
Realistic Expectations in Beekeeping
Robbing
Smoke
Space Management
Splits
Spring Beekeeping Management
Swarm Control
Ten Commandments of Beekeeping
Timing
Too Many Beekeeping Options?
Unlimited Broodnest
Unnatural Things in Beekeeping
Videos of some of my presentations
Water
Wintering Bees
Bee Pests
CCD
Enemies of Beekeeping
Four Simple Steps to Healthier Bees
Mite Bombs
Natural Cell Size
Nosema
Rationalizations on small cell success
Varroa Treatments
Wax Moths
Why I Use No Treatments of Any Kind
Queens
A Few Good Queens
Feral Bees
Genetic Diversity
Quality of Emergency Queens
Queen Flying Off
Queen Rearing
Queen Spotting
Queens For Sale
Races of Bees
Requeening a hot hive
Whole bee concept
Philosophy
Beekeeping Philosophy
Belief in Beekeeping
The Hardest Thing To Do In Beekeeping
How bees change your life
Learning
Native American Honey Bees
Scientific Studies
Other Links
Beesource Beekeeping Forum
Beesource Beekeeping Home
Beemaster Beekeeping Home Page
Dee Lusby on Small Cell Beekeeping
Bee Unto Others
Dave Cushman
Resistant Bees
Beekeeper Linda
Beekeeping like a girl
Bella Donna, Apitherapist
The Miller Method of Queen Rearing
(condensed from 50 years among the Bees) by C.C. Miller
____________
Transcriber's and Editors preface.
I edited a condensed version of just the queen rearing portion of "Fifty Years Among the Bees" so you can compare it to other methods. The complete book is in print by Dover publishing and available from Amazon and others.
This chapter is also published with other classic queen rearing books in the "Classic Queen Rearing Compendium"
____________
The Miller Method of Queen Rearing
Condensed from 50 years Among the Bees
By Dr. C.C. Miller
Published by
THE A. I. ROOT COMPANY
Medina, Ohio
1911
____________
QUEEN-REARING-BREEDING FROM BEST.
My sole business with bees being to produce honey, I am not particular to keep a popular breed of bees, only so far as their popularity comes from their profitableness as honey-gatherers. I am anxious to have those that are industrious, good winterers, gentle, and not given to much swarming. For some years I got an imported Italian queen every year or two. Then for a good many years I preferred to rear from queens of my own whose workers had distinguished themselves as being the most desirable. The chief thing considered was the amount of honey stored. Little or no attention was paid to color, and unfortunately no more to temper. So I had bees that were hybrids, hustlers to store, but anything but angels in temper. Then, beginning with 1906, I introduced quite a number of Italian queens, in the hope that among them I might find one as good as my hybrid stock, without so much ill temper. The hope was not realized, but continued effort may bring success.
IMPORTANCE OF SELECTION.
The queen being the very soul of the colony, I hardly consider any pains too great that will give better queens. The first thing is to select the queen from which to rear, for generally all rearing will be from the same queen, whether for the home apiary or an outside apiary. The records are carefully scanned, and that queen chosen which, all things considered, appears to be the best. The first point to be weighed is the amount of honey that has been stored. Other things being equal, the queen whose workers have shown themselves the best stores will have the preference. The matter of wintering will pretty much take care of itself, for a colony that has wintered poorly is not likely to do very heavy work in the harvest. The more a colony has done in the way of making preparations for swarming, the lower will be its standing. Generally, however, a colony that gives the largest number of sections is one that never dreamed of swarming.
I am well aware that I will be told by some that I am choosing freak queens from which to rear; and that it would be much better to select a queen whose royal daughters showed uniform results only a little above the average. I don't know enough to know whether that is true or not, but I know that some excellent results have been obtained by breeders of other animals by breeding from sires or dams so exceptional in character that they might be called freaks. I know, too, that it is easier to decide which colony does best work than it is to decide which queen produces royal progeny the most nearly uniform in character. By the first way, too, a queen can be used a year sooner than by the second way, and a year in the life of a queen is a good deal. I may mention that a queen which has a fine record for two successive seasons is preferred to one with the same kind of a record for only one season. At any rate, the results obtained in the way of improvement of stock as a result of my practice have been such as to warrant me in its continuance, at least for a time.
The danger from inbreeding must not be lost sight of entirely. With two or three hundred colonies kept in three different apiaries it is perhaps not great. Should signs of degeneracy at any time appear, it will not be difficult to introduce fresh blood.
CONDITIONS FOR QUEEN-REARING.
Having chosen the queen from which to rear, I have kept in mind that unless conditions are favorable the royal progeny of the best queen in the world may be very poor. Queen-cells must be started when the weather is sufficiently warm, when bees are gathering enough to make them feel that there is no need to stint the royal larvae in their rations, and until near the point of emergence it is much better that the cells shall be in the care of a strong colony. So I do not begin operations for queen-rearing until about the time that bees inclined to swarming would begin to make preparations therefor.
REARING QUEENS IN HIVE WITH LAYING QUEEN.
It would be too long a story to enumerate all the plans I have used in queen-rearing. I have reared excellent queens, and many of them, by the Alley plan, and by the Doolittle cell-cup plan, together with its modifications by Pridgen and others. I think I was the first one to report rearing a queen in a colony having a laying queen; and I have reared them in stories under as well as over the story having the laying queen. Neither is it absolutely necessary to have a queen-excluder between the stories. In lieu of an excluder I have used a cloth with room for passage at the corners. Neither excluder nor cloth is absolutely necessary; distance is enough. That first reported case was on this wise:
Upon a hive containing a colony had been piled four stories of empty combs for safe keeping. To make sure that the bees would not neglect the care of the most distant combs, I put a frame of brood in the upper story. A few weeks later I found a laying queen in the upper story with the old queen still below. The bees that had gone up to that frame of brood were so far from the queen that they had reared a queen of their own. A hole in the upper story had allowed the flight of the young queen without invading the domains of her mother. For those who produce extracted honey this plan might be used to advantage.
I have reared good queens by the old and simple plan of taking away the queen of a strong colony. Of course this must be a choice queen. Previous to the removal of the queen the colony is strengthened. Frames of well-advanced brood are from time to time given from other colonies until it has two-perhaps three-stories of brood. None of this brood, however, is given less than five or six days before the removal of the queen. The queen is taken with two frames of brood and adhering bees and put on a new stand in an empty hive, an empty comb and one with some honey being added.
TIME TO START NUCLEI.
In nine or ten days from the removal of the queen it is time to break up the queenless colony into nuclei. It might generally be left till a day or two later before a young queen would come out to destroy her baby -sisters in their cradles, but it is best to take no chances. If it were true, as formerly believed, that queenless bees are in such haste to rear a queen that they will select a larva too old for the purpose, then it would hardly do to wait even nine days. A queen is matured in fifteen days from the time the egg is laid, and is fed throughout her larval lifetime on the same food that is given to a worker-larva during the first three days of its larval existence. So a worker-larva more than three days old, or more than six days from the laying of the egg would be too old for a good queen. If, now, the bees should select a larva more than three days old, the queen would emerge in less than nine days. I think no one has ever known this to occur.
BEES DO NOT PREFER TOO OLD LARVAE.
As a matter of fact bees do not use such poor judgment as to select larvae too old when larvae sufficiently young are present, as I have proven by direct experiment and many observations. It will not do, however, to conclude from this that all queen-cells started by a queenless colony left to themselves will be equally good.
Bees have a fashion of starting cells for a number of days in succession, and will continue to start them when larvae sufficiently young for good queens are no longer present. So some means must be taken to make sure that no nucleus has for its sole dependence one of these latest cells. If several cells can be afforded for each nucleus, there is little danger they will all be bad. Neither is there great danger if a cell is chosen which is large and fine-looking. Perhaps the safer way is to give the queenless colony a frame with eggs and young brood three or four days after the removal of the queen, and then they will not be obliged to use the older larvae of the other combs.
PLACING QUEEN-CELLS.
Two or three frames of brood with adhering bees are taken for each nucleus. If one of the frames has a cell or several cells in a good location, well and good. If not, the lack must be supplied. But the cells must be where they will be sure to be well cared for. They must not be on the outer edge of a comb, with the chance to be chilled, neither must they be on the outer side of the comb, but on the side of the comb that faces the other comb. Any cells that are not just where they are wanted must be cut out. For this purpose I like a tea-knife with a very thin and narrow blade of steel.
STAPLING CELLS ON COMB.
A staple, such as is used to fasten a bottom-board to a hive, is used to fasten a cell in place. The cell is placed where it is wanted, then the staple is placed over it, one leg of the staple close to the cell, and the other leg is pushed deep into the comb (Fig. 85).
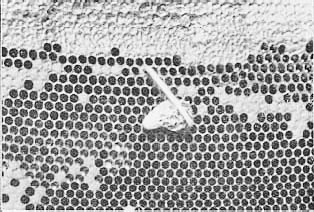
Fig. 85,-Queen-Cell Stapled on Comb.
MAKING BEES STAY IN NUCLEI.
Each nucleus is put upon a stand of its own, and the entrance is plugged up with leaves so that no bee can get out. One of the nuclei, however, is left without having its entrance closed, and this is put in the place of the hive which contains the queen, and the hive with the queen is put back on the old stand from which the queen was first taken. The entrances may be left closed until the shrinking of the leaves allows the bees to make their' way out, but I generally open them in about twenty-four hours, first pounding on the hive to make the bees mark their location upon emerging. Although queen-less bees are much better than others at staying wherever they are put, there will be still fewer bees return to the old place if the nucleus is fastened in twenty-four hours or longer.
LOOKING FOR EGGS.
Twelve or fourteen days after forming the nuclei, I look to see if the queens are laying. I might find eggs in less time, but not always, and at any rate not in considerable number, and it saves time on the whole not to be in too much of a hurry. If no eggs are found a comb of young brood is given as an encouragement to start the young queen to laying, and a day or two later, if queen-cells are started on this young brood, a mature queen-cell is given.
KEEPING BEST QUEEN IN NUCLEUS.
Instead of having my best queen in a strong colony, as in the plan just given, she is usually kept in a two-frame nucleus throughout the summer, the nucleus being strengthened into a full colony in the fall for wintering. One object of this is to make the queen live longer. It is generally understood that a worker lives a longer time if it has little work to do, and probably the same is true of a queen. As laying eggs is her work, the less the number of eggs she lays the longer she ought to live, and in a nucleus she lays a smaller number of eggs than in a strong colony.
There is another reason for keeping her in a nucleus. Some who have tried to have comb built in the colony containing their best queen complain that they can get only drone-comb built. That may be divided by filling the frame with worker-foundation, but the better way is to keep the colony with the queen so weak that only worker-comb will be built. In a nucleus only worker-comb will be built.
STARTING BROOD FOR CELLS
Having my breeding queen in a two-frame nucleus, I take away one of the combs, and in its place put a frame in which are two small starters four or five inches long and an inch or two wide. One of these starters is put about four inches from each end (Fig. 86). The nucleus must be strong enough in bees so that a week later this frame will have a comb built in it that will fill .most of the frame, the comb being fairly well filled with eggs and young brood (Fig. 88). It is taken away, and another frame with two small starters put in its place as before. Thus this nucleus will furnish once a week a frame of comb with brood of the best sort for queen-rearing. It will be a day or so after the frame is given before the queen lays in it, so that the brood will not be too old even if the bees were so foolish as to prefer it.

Fig. 86.-Starters in Breeding Frame.
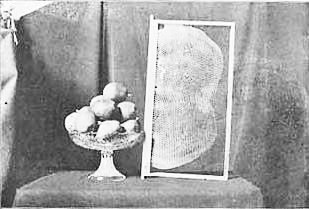
Fig. 88.-Comb for Queen-Cells.
The comb being new and tender makes it probably an easier job for the bees to build queen-cells upon it; at any rate they always show a preference for such comb, and start on it a larger number of cells than they would on older comb.
Having now arranged for the right kind of brood and eggs to be ready on the same day of each week, the next thing is to find the right kind of bees to start the cells. Not only to start them, but to take the very best care of them. We can probably find no bees better fitted to produce good queen-cells than those that of their own accord have already engaged in the business. So a strong colony is chosen which has already started queen-cells in preparation for swarming. All queen-cells already started are destroyed, the queen is removed, and one of the frames is taken away, leaving a vacancy in the center of the hive. Most likely the colony has one or more supers, but these are not to be taken away.
BROOD FOR QUEEN-CELLS.
We now go to the nucleus containing our best queen, take out the frame with the virgin comb, and replace it with an empty frame with its two starters, brushing back into the hive the bees from the comb taken out, and closing the hive. Looking at the comb taken out, you will see that instead of the oldest brood being in the center, it will be in the two places where the two starters were put. It was for this purpose the two starters at the sides were given rather than a central one. For by this means the waving contour will give opportunity for a larger number of queen-cells on the edge of the comb than would otherwise be the case.
TRIMMING THE BREEDING-COMB.
For a little distance at the edge, the comb contains eggs only. This part is trimmed away, leaving the youngest of the brood at the edge of the comb (Fig. 89). One reason for this is that, other things being equal, the bees show a decided preference for building on the edge of a comb. Another reason is that I decidedly prefer to have cells on the edge, thus making them easier to cut out when wanted. The part cut away would only be in the way of both of us.
BEES USING YOUNG LARVAE ONLY.
When a queen is taken away from a full colony, the bees start cells from young brood, and as I have already said, they continue to start fresh cells for several days, and until after there is no longer brood of the proper age, so that the last cells started will contain larvae too old to make good queens. But on these combs prepared as I have described, they do not do so. Rarely, if ever, will a cell be found elsewhere than on the edge of the comb, and I have never known the bees to start a cell after the larvae were too old. I do not know why there is this difference. I only know the fact. But it is a very convenient fact.
AGE OF LARVAE FOR QUEENS.
Scientists tell us that a worker-larva is fed for three days the same as a queen-larva, and then it is weaned. Theoretically, then, up to the time a larva in a worker-cell is three days old, it ought to be all right to rear a queen from. Practically, I do not believe a larva three days old is as good as a younger one. The only reason I have for so believing is the expressed preference of the bees themselves. Give them larvae of all ages from which to select, and they always choose that which is two days old, or younger. Indeed, it will be seen that in the comb from which I have trimmed the edge (Fig. 89) the larvae on the edge of the comb have been out of the egg but a short time, for I merely trimmed away the eggs, and possibly not all of them.
PLACING THE BREEDING-COMB.
The breeding-comb, thus properly trimmed, is taken to the queenless colony, and put in the vacancy that was left for it. On the top-bar of the frame is penciled the date on which the cells are to be cut out, allowing ten days from the time of putting in. Thus, if the frame be given June 27, the number 7 is put on the top-bar, July 7 being ten days later than June 27. No need to put the month on. Beside giving the date, that figure marks the frame, so I can know at a glance which frame to take out. At the same time a memorandum of this date is put in the record book to remind me when to cut the cells.
Some one may ask, "But if you leave nearly all the old brood in the hive, will, the bees not start cells on them, with only the smaller part on your breeding-comb?" So I thought at first, and took some pains to have no very young brood of the old stock left. But I found upon trial that when I left all the young brood of the old stock, the bees ignored this, at the most starting upon it one, two, possibly three cells, confining their attention to the prepared frame I had given. Probably the hardness of the old combs and the lack of convenient places in which to build cells convince the bees that it is better to use the soft comb where room is abundant. Of course a cell or two on the old combs can do no great harm, for they will not be used.
MORE THAN ONE NUCLEUS IN HIVE.
The frames for nuclei are the regular full-sized frames, and a full hive may be used for each nucleus, but it is economy to have the hive -divided up into two or three compartments for as many nuclei. Three nuclei in one hive are mutually helpful in keeping up the heat, and thus it is possible to have the nuclei weaker than if each nucleus was by itself, while results are as good with the three weaker nuclei in the one hive as with three stronger nuclei in three separate hives.
NUCLEUS-HIVE.
For many years I have had hives divided into two or more compartments, and have had much trouble from the bees finding a passage from one compartment to another, but my latest nucleus hives have not troubled in that way. They are made from ordinary 8-frame hives together with the 2-inch-deep bottom-board. First, two pieces are nailed on the inside of the bottom-board, each piece 18 1/4 x 1 3/4 x 7/8. One piece nailed 4 1/2 inches from one side, the other 4 1/2 inches from the other side. These pieces do not lie flat in the bottom, but stand on edge, with 1 3/8 inches between them. Then the hive is fastened on the bottom-board with the four usual staples. Two division-boards, each 18 1/4 x 9 3/4 x 5-16, are now put in place and crowded down tight upon the two pieces in the bottom-board. These two division-boards are 4 5/8 inches from each side, leaving 2 1/4 inches between them. The four spaces at the top, at the ends of the division-boards, are closed by blocks 3/4 x 1/2 x 5-16, whittled enough to allow them to be wedged into place. Light 1 1/4-inch wire-nails are driven through from the outside to hold the division-boards in place. A block 10 x 2 x 7/8 is pushed into the entrance centrally, and held there by a nail lightly driven in front of it. That leaves an entrance at each end of the block for the two side compartments, but no entrance for the middle compartment. For this purpose an inch hole is bored in the back end of the hive midway between the two corners, its center being about three inches from the upper surface of the hive. Three boards of half-inch stuff cover the three compartments, and over this is an ordinary hive-cover.
At Fig. 90 will be seen a bottom-board for a nucleus hive. You will notice that the two pieces that run lengthwise through the center of the bottom-board are a quarter of an inch shallower than the rim of the bottom-board. If they were 2 inches deep instead of 1 3/4, the bottom-bars of the frames would rest directly on them. Of course the division-boards are deep enough to come clear down upon these two pieces.
Two nucleus-hives will be seen at Fig. 91. The one at the right faces us, showing the entrance at each side. The back of the left hive is toward us, showing the round hole near the top, which serves as an entrance to the middle compartment.
LARGE SPACE FOR MIDDLE FRAME.
In one of these side compartments there is abundant room for two frames and a dummy, and three frames without the dummy can with care be crowded in. The central compartment will of course take only one frame. It seems as though 2 1/4 inches is quite too much space for one frame, but I use that space advisedly. Many years ago I made a nucleus hive with six compartments, and at that time not having had much experience I made each compartment 2 1/4 inches wide. Years afterward I made another nucleus hive, and smiling at my former ignorance and congratulating myself upon the superior knowledge I had gained with the passing years, I made the compartments more nearly in accord with the usual space occupied by each frame in a hive, making each compartment-I'm not sure whether it was 1 5/8 or 1 3/4. At any rate, the bees swarmed out of these limited quarters to such an extent that I could not use them, whereas they had not swarmed out of the 2 1/4 compartments. Neither have they swarmed out of these later ones. Having so much room in these central compartments, the bees sometimes build pieces of comb on the sides which I must clean away, but that is better than to have them swarm out.
CONTENTS OF NUCLEUS-HIVE.
A nucleus hive is tenanted by a two-frame nucleus on each side and a one-frame nucleus in the middle. Care is taken to choose one of the best frames of brood for the middle nucleus, and perhaps a few extra bees are brushed in. A third comb may be put in each of the side compartments, or a dummy, the same as the dummies used in the regular hives.
MAKING THE BEES STAY.
When populated, the entrances of the nuclei are plugged up with green leaves. These are generally taken away twenty-four hours later, after the hives are pounded to stir up the bees, but if they are neglected the leaves will dry and shrink so the bees can make their way out. It is better to form nuclei with queenless bees, for they are not so much inclined as others to go back to their old place.
BABY NUCLEI.
There has been much interest in the matter of having queens fertilized in small nuclei containing only 200 bees or so. About the year 1863 I had seen miniature nuclei in the apiaries of Adam Grimm, but they had not so few bees as the so-called baby nuclei of to-day. Of course, I had a number of queens fertilized in baby nuclei, but I did not go to the trouble of having hives specially built for them. I merely used an 8-frame dovetailed hive, putting in it sometimes a 1-pound section nearly filled with honey, and sometimes two such sections side by side. A frame of brood with its adhering bees was taken from some colony, the bees shaken or brushed into the nucleus-hive quickly, a virgin not more than a day or two old dropped into the hive among the bees and all hastily closed, the entrance having been closed in advance. Of course, the frame of beeless brood was returned to its old place. Three days later the entrance was opened, and in due time the queen was laying.
However it may be for the commercial queen-rearer, for the honey-producer there seems no great advantage in baby nuclei. He generally needs to make some increase, and it is more convenient for him to use 2 or 3-frame nuclei for queen-rearing, and then build them up into full colonies.
REGULAR HIVES FOR NUCLEI.
One year I tried rearing queens on a commercial scale, producing them for Editor G. W. York of the American Bee Journal. I may say, parenthetically, that one season was enough to convince me that it was best to stick to honey-production, rearing queens only for my own use. But I had 50 three-compartment hives left on hand, and in spite of that, truth compels me to say that lately they generally lie idle, and I use a full hive for each nucleus, merely putting 3 or 4 frames in one side of the hive, with a dummy beside them. To be sure, it takes more bees than to have three nuclei in one hive, but it is a good bit more convenient to build up into a full colony a nucleus that has the whole hive to itself.
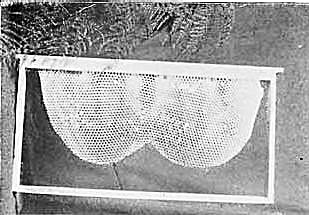
Fig. 89.-Comb for Queen-Cells, Trimmed.
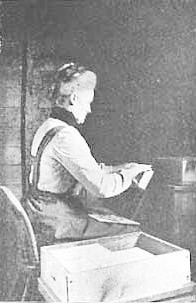
Fig. 87.-Putting Foundation in Sections.
QUEEN-CAGE.
When we go to give queen-cells to the nuclei, we are provided with introducing queen-cages. The first introducing-cage I devised was the Miller introducing-cage, listed in the catalogs of supply-dealers. Then I got up one I liked better, three of which are shown in Fig. 92, the blocks containing the candy being separate from the cages. This may be called Miller cage No. 2. Two blocks 3 inches by 1/2 by 1/4 and a piece of wire-cloth 6 1/2 x 1 7/8, form the material for the cage. Lay the two blocks parallel on their edges, and nail on these one end of the wire-cloth, the end of the wire-cloth corresponding with the ends of the blocks. Fold the wire-cloth around the ends of the blocks and nail it on the other side, and you have a cage 3 x l 7/8 x 1/2, outside measure. The plug to close the cage is not so simple, for the cage is to be provisioned, and the plug holds the candy. Two blocks l 1/4 x 1/2 X 1 1/4, a piece of tin and a piece of section stuff each ll/4 inches square form the material for the plug. Lay the two blocks parallel on their sides, with l/4 inch space between them. On these nail the piece of tin, turn over, and nail on the section stuff. Near one end drive a tack partly in to prevent the plug going too far into the cage. That makes all complete.
After using these for some years, I got up another that in some respects I like still better. This is shown in Fig. 87 1/2, and may be called Miller cage No. 3. Make a block 3 3/4 x 1 1/8 x 5-16. From one side of the block, at one end, cut out a piece 1 1/2 x 3/8, making the block as shown at No. 1 Fig. 87 1/2. Cut a piece of tin 1 x 2 inches. Stand the block on edge with the cut-out place uppermost, and in this cut-out place lay a lead pencil or similar object 11-32 in diameter. Over this bend the tin, letting it come out flush with the end of the block. Then laying the block on its side, still keeping the pencil in place, drive two 1/2-inch wire nails through tin and wood, clinching on the opposite side. When the pencil is withdrawn there is left a tube to be filled with candy. So much for the plug. The cage itself is made of a piece of wire-cloth 4 inches square, if one edge is a selvedge. If there is no selvedge, it must be 4x 4 1/2 and 1/2 inch folded over as a selvedge to prevent raveling. A block must be made, not to be part of the cage, but to be used to form the wire-cloth over. It must be a little larger than the first block, say 5 x 3-16 x 3/8. If the block were the same size as the first, there would be too tight a fit, and if the fit be loose it is easy to wedge in a thin slip, as a piece of wood separator. The wire-cloth is wrapped around the block and allowed to project at one end about 1/2 inch. A light wire is wound twice around, about 1/2 inch from the selvedge end (which is the part that does not project) and fastened. Another wire is similarly fastened about 1 3/4 inches from the first wire. Now the projecting part of the wire-cloth is bent down upon the end of the block, and hammered down with a hammer. That completes the cage, but for convenience in hanging it between brood-frames one end of a light wire 7 or 8 inches long is fastened into one side of the cage about 1/2 inch from the open end. To put it in a hive, I shove the frames apart, and holding the end of the wire lower the cage where I want it, and then shove the frames together. That leaves 3 inches or more of the wire above the top-bars, and when I want to take out the cage I take hold of the wire, draw the frames apart, and lift out the cage. The wire serves also to mark the spot where the cage is.
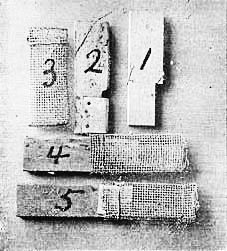
Fig. 87 1/2-Miller Cage No. 3.
When the tube is filled with candy, it may be pushed so far into the cage that the bees can not get at the candy. Then when it is desired that the bees shall get at the candy, the plug is drawn out until the candy is exposed. This is more reliable as to time than to have the usual cage with the candy covered with card-board. With the card-board there is no certainty as to whether the queen will be released in 24 hours or much longer. Sometimes it may be several days. With the No. 3 cage you know just how long the bees have the cage before they get to the candy, and after the candy is exposed you may count on the bees clearing out the candy in about 24 hours.
It may be objected that it is troublesome to open up the hive to change the position of the plug in the cage. That is true, and often, if not generally, the cage is not put between the combs, but thrust in the entrance, making sure that it is where it will be protected by the bees. After being there about two days, it is only the work of a minute to take out the cage, expose the candy, and put the cage back in the entrance.
Sometimes, if I want to have the work done automatically, I use a device that delays the work abort as much as the card-board, but is more uniform in the time it takes. I thrust into the center of the tube of candy its whole length a wooden splint about 1-16 of an inch square, and that delays the bees at gnawing out the candy.
When a queen-cell is to be caged, the No. 2 cage allows more room for the cell.
For making queen-cages, instead of the common painted wire-cloth that is used for screen doors, I like Better extra heavy bright wire-cloth. It is more substantial. But E. R. Root says queens have been poisoned in such cages, so have a care, although I have had hundreds of queens in them without noting any harm. Perhaps all tinned wire-cloth is not alike.
DISTRIBUTING QUEEN-CELLS.
When the queen-cells are to be distributed, the first thing is to provision a number of queen-cages of the No. 2 style, with the usual queen-candy, tacking a piece of pasteboard on the end of the plug. Then we go to the nucleus where the cells are stored, cut out the cells, rejecting any that do not appear satisfactory, and put the cells in the cages. Some cells, however, are left uncaged. When we come to a nucleus that has had no queen for a day or more, there is no need of caging the cell. It is put against the comb in a good place, and fastened there with a hive-staple (Fig. 85). Coming to a nucleus with a queen which we wish to remove, we put the queen in a cage, and give the nucleus a caged cell, laying the cage against the comb and nailing it there with a l 1/2 or 1 3/4 wire-nail (Fig. 93). This nail is slender so as to push easily through the meshes of the wire-cloth. Then the young queens that we have removed are used wherever needed.
BRUSHING BEES OFF QUEEN-CELLS.
Before cutting cells from the comb the bees must be removed, and it would mean the ruin of the cells to shake the bees off. Brushing with a Coggshall brush, although it might do with extreme care, would be likely to result in torn cells. Even something no stiffer than goldenrod or sweet clover needs much care. I like best a bunch of long and soft June grass-a very flimsy affair to use as a brush, but it is safe.
ADVANTAGE OF CAGING CELLS.
Of course the object of caging the cells is to prevent the bees from tearing them down. At the time of taking a queen out of a nucleus, if a cell were merely stapled on, the bees would be pretty sure to destroy it, for not yet realizing that their young laying queen has been taken from them, they feel no need of anything like a queen-cell. So the cage saves the time and trouble of waiting and making a second visit another day.
There is, however, another advantage in using the cage, making it somewhat desirable to use it in all cases. We often want to know what has been the fate of a cell, and can generally tell pretty well by its appearance. If it has the appearance of most of those in Fig. 94, we know that; a young queen has emerged and must be in the nucleus. If it is torn open in the side, like the one at the extreme right, we are sure that the young queen in it was destroyed by the bees.
If the cells have merely been stapled on, the bees are so prompt about removing them as soon as they are no longer of any use that scarce a vestige of them is left, so we have nothing to judge by. But when a cell is enclosed in a cage, the bees are very slow about removing it, so the cage gives us a better chance for judging.
APPEARANCE OF VACATED CELLS.
In Fig. 94 the first three cells at the left have the cap still adhering by a neck, showing that it has been only a short time since the queen emerged, providing the cell has not been caged; if it has been caged the queen may have been out some time. The fourth cell looks entire, as if it yet contained a young queen. But it is deceptive. The bees have a trick of fastening the cap back again as if it were a great joke, sometimes thus imprisoning one of their own number. A very close look will generally show a little crack, and a very little force will be needed to pick the cap loose. The next six cells show plainly that a young queen has emerged from each, and finding a cell of that kind is just as good evidence as a sight of the queen; only I would a little rather see the queen for the bare chance that she may not have perfect wings. As already mentioned, the cell at the extreme right shows by the hole in its side that no queen ever came out of it alive.
MILLER QUEEN NURSERY.
Whatever the advantages of using queen-cells instead of virgin queens, there are also advantages in having the young queens hatch out in a queen nursery. So I have made considerable use of a nursery of my own devising, Fig. 88 1/2. It may take the place of a brood-frame in any hive, in the lower story or in an upper story, and it does not matter whether a laying queen is in the hive or not.
For this nursery I use a regular Miller frame, which lends itself to the purpose admirably, top-bar, bottom-bar and end-bar being all of the same width, 1 1/8 inches. If you haven't a Miller frame, you can easily make a frame having all parts the same width, 1 1/8 inches; only be sure the end-bars are at least 3/8 thick, and have the outer dimensions of the frame the same as the frames you have regularly in use. I'll give instructions for making a nursery with a frame of the Langstroth size, and if your frames are of different size you must act accordingly.
Make 7 pieces, each long enough to reach from top-bar to bottom-bar (with top-bar 7/8 and bottom-bar 1/4, that makes the length 8 inches), 1 1/8 wide, and 3/8 thick. Saw-kerfs must be made on each side of these 7 pieces. Beginning 1 1/4 inches from one end, on one side of the piece, with a very fine saw, make a saw-kerf by sawing about half-way through. Make a similar kerf 1 1/4 inches from the first, and then, each time measuring off 1 1/4 inches, make 3 more kerfs, making 5 in all. (Your last kerf will be more than 1 1/4 inches from the end, but that's all right.) Do the same thing on the opposite side, beginning at the opposite end. Make similar kerfs in each end-bar, measuring from the top-bar for one end, and from the bottom-bar for the other end. Of course these kerfs are to be made on the inside of the end-bar, and none on the outside. Now distribute these 7 pieces at equal distances from one end of the frame to the other, and if you are exact about it the distance between each two will be 1 25-32 inches. Fasten these 7 sticks in by driving one nail down through the top-bar into each, and two nails through the bottom-bar. Before nailing, make sure that each stick faces right, as mentioned further on. Nail upon one side of your frame a piece of wire-cloth to cover it (17 5/8 x 9 1/8). Have the nails not more than 2 inches apart all around and on each stick. I use bright wire-cloth, extra heavy, with meshes of the usual size in screen-doors.
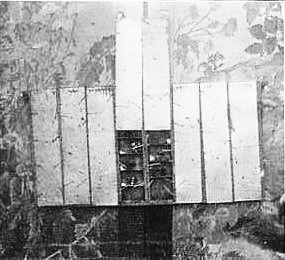
Fig. 88l/2-Miller Queen Nursery.
You now need 40 pieces of tin, 2 x 1 1/8 inches to go into all the saw-kerfs. Each piece of tin serves as a shelf, thus dividing up the whole into 48 compartments. You will now see the necessity of having the sticks face each other so as to have the kerfs correspond, as mentioned a minute ago. Look out for this before you nail the sticks in place.
To close these compartments, you need 8 pieces of tin, each 10 x 2 inches. That's 7/8 inch longer than the depth of the frame, allowing the 7/8 to be bent over at right angles on the top-bar. To hold these covers in place I use heavy pins bent over. Small screw-hooks of straight pattern might do better. Three are needed in each end-bar, and 6 in each upright. Of course these tin covers are put in at the top and slide down.
You will see that each of the compartments furnishes a large amount of room, 40 of them being 1 25-32 x 1 1/4 x 1 1/8 and the remaining 8 being larger. That gives abundance of room to put in the largest kind of a queen-cell. With each cell is given a ball of candy the size of a pea.
ADVANTAGES AND DISADVANTAGES OF A QUEEN NURSERY.
If a ripe queen-cell is given to a nucleus or colony, there is no way to be sure that a queen that is all right will issue from it. She may be imperfect as to her legs, and, what is still worse, her wings may be so deficient that she never can fly. If she can not fly she can never be fertilized, and so is worthless. Indeed she is worse than worthless, for she is wasting the time of the nucleus. Sometimes, indeed, it happens that the occupant of the queen-cell is dead. All of this is avoided by having the virgins hatch out in a nursery. If a cell is cut into, and is given to a nucleus, the bees will at once destroy it, but in the nursery it will hatch out all right.
One may have a lot of queen-cells on hand with no immediate use for them. It will not do to leave them without cutting out beyond a certain time, for the hatching out of the first one means the death of all the rest. But if they are put in a nursery they are safe, and may be left stored in the nursery for some days after hatching out.
Over against these advantages stands the one disadvantage that in the nursery the bees are not allowed to come in immediate bodily contact with the cells, nor with the young queen after she issues from the cell. Some think this so serious a disadvantage as to overbalance all the advantages of the nursery. It is claimed that the clustering of the bees about the cells and the young queens does more than merely to keep up the temperature to a certain point, and that when this close contact is lacking something will be lacking in the resulting queens. Also that the young queens thus isolated and imprisoned are in a frightened condition, and that a young queen reared in such an atmosphere is not the same as one that has the feeling that she is all the while closely surrounded by friends.
So whether it be wise to use a nursery or not, it will certainly be wise not to put cells into it before it is necessary for their safety, nor to leave a virgin in a nursery any longer than necessity demands.
QUALITY OF QUEENS.
The question has been raised whether queens reared in the way I have described are as good as those reared by the latest methods. I think I can judge pretty well as to the character of a queen after watching her work for a year or two; I have kept closely in touch with what improvements have been made in the way of queen-rearing, and have reared queens by the hundred in the latest style; and I do not hesitate to say that the simple method I have given produces queens that can not be surpassed by any other method.
BEGINNER IMPROVING STOCK.
I have been asked whether I would advise a beginner with only half a dozen colonies, one of them having a superior queen, to use the plans I have given to rear queens from his best queen. I certainly should, if he intends to give much attention to the business and increase the number of his colonies. The essential steps to be taken are simple enough; and even a beginner can easily follow them. But in a few words, here is what I would advise him:
Take from the colony having your best queen one of its frames, and put in the center of the hive a frame half filled or entirely filled with foundation. If small starters are used in a full colony the bees are likely to fill out with drone-comb. A week later take out this comb, and trim away the edge that contains only eggs. Put this prepared frame in the center of any strong colony after taking away its queen and one of its frames. Ten days later cut out these cells, to be used wherever desired, giving the colony its queen or some other queen.
Now there's nothing very complicated about that, is there?
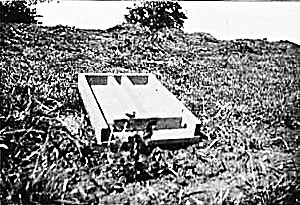
Fig. 90. Nucleus Bottom Board
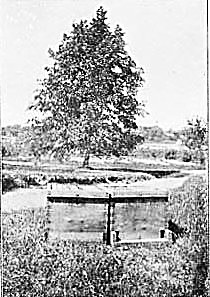
Fig. 91. Nucleus Hives
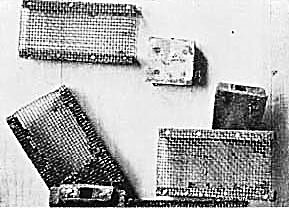
Fig. 92. Improved Miller Queen-Cages
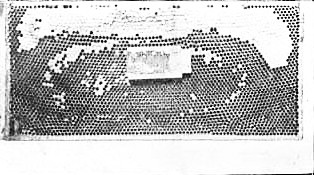
Fig. 93. Caged Queen-Cell
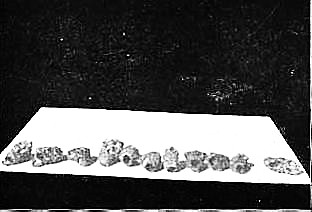
Fig. 94. Vacated Queen-Cells
____________
The original book is in the public domiain. This arrangement of the book Copyright 2004 by Michael Bush