Beekeeping
Bush Bees Home
Queen Rearing Page
Table of Contents
The Breeder Hive...40
Keeping the Breeder Hive Stocked with Bees...42
The Feeder...43
Stocking the Breeder Hive...44
The Starter Hive...46
Food and Water Necessary to the Bees in the Starter Hive...47
Getting the Bees with Which to Stock the Starter Hive...48
Preparing the Cells...49
Putting the Prepared Cells Into the Starter Hive...51
Program of These Rejoicing Bees...52
Finishing the Cells...54
Caution...60
The Adolescent Hive...69
Introducing the Cells...72
Stocking the Mating Hives...72
How Long Should the Bees be Confined to the Mating Hive?...74
Mating Hive Records...75
Bee Candy...82
Shipping Queens...83
A Review...83
Starting Cells Every Third Day...84
Modifications for the Small Beekeeper...85
Mating Hives for the Small Beekeeper...86
Mating Queens in an Upper Story...86
Requeening by Giving a Ripe Cell...88
Click on Thumbnails for bigger pictures
Better Queens Method
_________________________
Transcriber's and Editors preface.
I edited a condensed version of Better Queens because, while the full book is wonderful and educational and should be read before this version, it chases a lot of "rabbits" and explains a lot of the reasons and explains a lot of the failures to help you avoid those. Assuming you have read the full text of Better Queens, and are convinced you want to follow his method and want it distilled down to just the method, here it is.

I've also published it along with the full book and you can also buy it from most online bookstores including:
Amazon US | Amazon UK | Barnes and Nobel US | Booktopia AUIt is also published with other classic queen rearing books in the "Classic Queen Rearing Compendium"
_________________________
The Better Queens Method
(condensed from Better Queens)
By Jay Smith
_________________________
The Breeder Hive

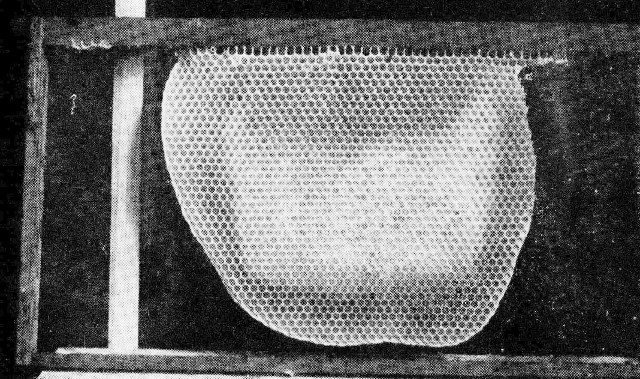
The wood comb
The cut shows the frame partly filled with wood, leaving a small comb five and one-half inches (14cm) by nine and one half inches (24cm). These frames we shall call wood frames. It takes the queen but a short time to keep these combs filled with brood so she can devote her time to laying in our new comb. The standard size foundation will do very well but we prefer the size used in the Modified Dadant frames as it is deeper. A sheet is cut into four parts and fitted into standard frames. These frames of foundation may be drawn out in either the finishing colonies or in the front part of the breeding queen hive. When one of these new white combs is placed between the two combs partially filled with wood the queen at once begins to lay in it as the other two combs are filled with brood and the new comb is right between. This makes an inviting comb for the queen to lay in, which she does at once. A wooden partition separates the compartment containing the three combs from the rest of the hive. A cleat is nailed to the bottom of the hive below the partition. A space of an inch (2.5cm) is left between the cleat at the bottom and the partition above. A zinc queen excluder is tacked over this opening. It is best to have the excluder at the bottom for if higher up the bees insist on filling the space with comb which they will not do when the excluder is placed near the bottom. When using the regular cover, the queen would sometimes get out of her partition due to the fact that wax or propolis would accumulate on top of the partition. To overcome this the partition is extended three-fourths of an inch (19mm) above the edge of the hive. We use two covers, one for the back part and one for the front. Then the regular telescope cover is placed on top. With this arrangement the queen never gets out of her stall. The cut will show how the hive is constructed better than a description.
Putting new comb into the breeder hive

We use a jumbo hive cut down to fit the standard frames. One may use the standard hive but it will be necessary to nail cleats around the bottom to make room under the frames. The entrance is about midway in front of the hive.
Keeping the Breeder Hive Stocked with Bees
If cells are started every day the bees in the breeder hive will rapidly decrease in numbers as the only emerging brood they will have is what comes from the combs in the wood frames, therefore, some way must be provided to keep up the strength of the colony. We open the starter hive in front of the breeder hive when we take the started cells out. Many young bees will take wing so when we remove the starter hive, these young bees will join the bees in the breeder hive. This is a great help but shortly they will need more bees in which case we shake the bees from not more than one comb from the starter hive. In this way their strength will be kept up. Sometimes in the past we dumped the bees from the starter hive in front of the breeder hive. This proved unsatisfactory as so many bees were apt to kill the breeder. When they did not the breeder was apt to stop laying for a time. Adding the smaller number of bees has never given us any trouble.
The Feeder
This is an important part of the breeder hive. When no nectar is coming in the bees must be fed if we are to get that lavishly fed larvae we have pointed out is so necessary for best results. It is built on the back of the hive. A hole is bored in the back of the hive so the bees can get into the feeder. Slats are put in as illustrated, then melted wax is poured in to make the feeder waterproof and also to wax the slats tight to the bottom in order that no syrup or honey can get under these slats to sour. A cleat is nailed to the hive just above the feeder to keep out the rain. When feeding, the cover of the feeder is slid back and the honey or syrup poured in. As there is no bee disease within many miles of our apiary we feed off grades of honey. Honey is better food for the bees than sugar syrup but if disease is present sugar syrup should be fed. However, from years of observation I am confident the nurse bees cannot secrete milk with proper nourishment when sugar syrup is fed. I was surprised when I first put honey in the feeder. It was during a robbing season and I wanted to test it for I had a theory feeding with it would not cause robbing. It proved better than I expected for by looking at the bees at the entrance you could not tell they were being fed. With any other feeder I ever tried we had to feed at night or the robbers would rob out the colony. What causes robbing is that the bees get daubed with honey and then go out in front to get more air. The bees from the other hives pounce upon them and then proceed to clean up the whole hive. With our feeder few if any bees get daubed and those that do have to pass through a cluster of bees, then through the queen excluder and then another cluster of bees. By that time they are licked clean and do not have to go out for an airing.
Stocking the Breeder Hive
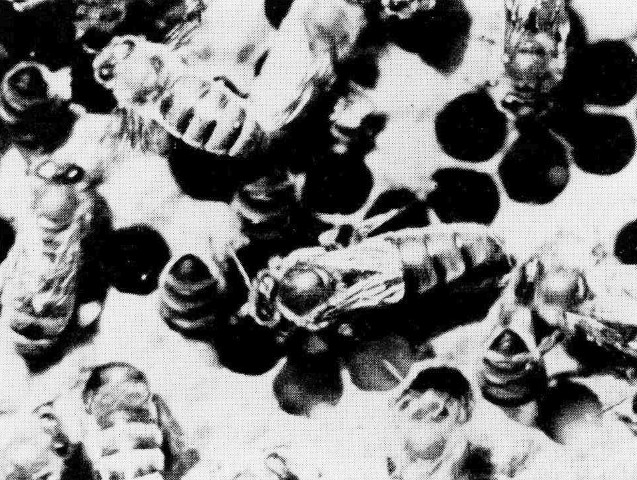
In case your breeding queen is in a fairly strong colony, the bees and brood are placed in the front compartment and one frame of brood and the queen is put in the back compartment. The two frames fitted with wood are placed in the back compartment with the frame of brood between them. Feed is then placed in the feeder. As soon as the queen has eggs and brood in the two outside combs, the frame of brood is removed and a new white comb is placed between the two combs. In case the colony is strong, most of the brood may remain in the front compartment, but later most of this must be removed to make room for the combs containing eggs. As stated, we should have several drawn combs ahead. When the brood in the front compartment is removed frames with sheets of foundation may be given. As the bees are being fed, they draw the foundation readily. The comb given should be left 24 hours when it will be well filled with eggs. It is then placed in the front compartment and another frame of new comb is given. This is repeated every day until there are three frames containing eggs in the front compartment. When the fourth comb of eggs is put in the front, the first one given will now contain tiny larvae just out of the egg and as this is practically all the brood that large numbers of bees have, the tiny larvae will be found to be fairly flooded with bee milk. In giving comb to the breeding queen, it should be trimmed back to the foundation provided the bees have built comb at the edges and bottom of the foundation. The queen prefers to lay in natural built combs rather than those built from foundation. I have used all kinds of foundation and find this to be true. The comb shown was not trimmed back so it can be seen that the queen laid in a sort of horseshoe shape.
Larvae ready for use in cell starting
The bees do not build cells with such regularity as the cells in foundation, therefore such comb is difficult to cut as many larvae will be destroyed. When the eggs are laid in cells drawn from foundation it is much better if the row of cells is uniform and easily cut in a straight line. Now let us examine the larvae in the cells to see if they are getting lavish feeding, the necessity of which we have so frequently stressed. The larvae are so small they can hardly be seen with the naked eye. They are flooded with bee milk fully as much as larvae in swarming cells. In these same cells they will remain while the bees go right on feeding them. Let us now prepare to start those larvae on the road to queendom.
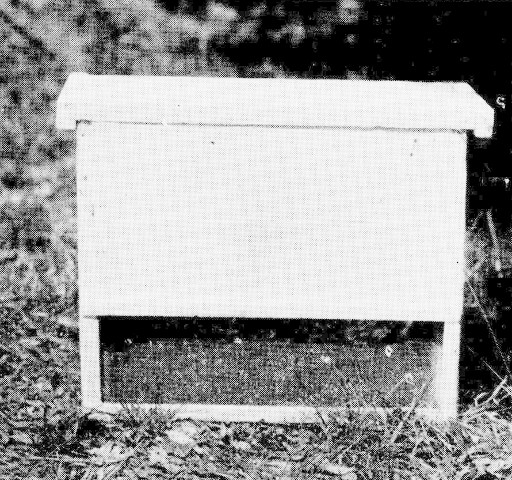
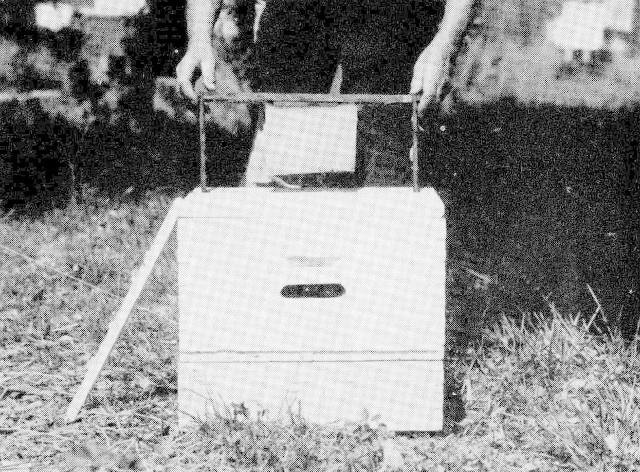
The starter hive
The starter hive
Many years ago Henry Alley used what he termed "the swarming box". He did not start cells in it but confined bees in it for some hours and at night dumped them into a hive with no brood or queen. He seemed to think it necessary to keep the bees queenless for some time to get them to accept the cells. Then the prepared cells were given to the bees in a hive containing two frames of honey and pollen. Mr. G.M. Doolittle said the bees would accept cells better if kept queenless for three days. In my experience I find the bees accept the cells just as readily after an hour or two as they do if left queenless for a longer period. We usually keep them confined in the starter hive from one to two hours which gives them plenty of time to clean up any honey that may have been spilled on them when shaking them into the starter hive. In later years Eugene Pratt gave the cells direct to the bees confined in a box and he called it "The swarm box". We prefer to call it "The Starter Hive" as it is used for starting cells and has no relation to a swarm. Our starter hive is made wide enough to hold five standard frames. The total depth is 17 inches (43cm). It has a wooden bottom with cleats at the sides making it suitable for feeding or watering bees. Three frames of honey and pollen are put in but no brood. In case no nectar is coming in, the bees that are to be used in stocking the starter hive should be fed three days before using them and this feeding should be continued each day until they are shaken into the starter hive.
Food and Water Necessary to the Bees in the Starter Hive
A matter that I believe most of us have overlooked is the necessity of food and water for the confined bees. All have observed how bees carry water in abundance when rearing brood. Now this water is even more necessary when rearing queens for the bees require more water when producing the milk in abundance. The best way to provide this is to fill the center comb with diluted honey. This not only provides the necessary water but the food it contains acts as a flow of nectar. In case some 50 cells are to be started from five to six pounds (2 to 3 kg) of bees should be used. In case from 75 to 100 cells are to be started from 8 to 10 pounds (3.5 to 4.5kg) of bees should be put in. If larger number of bees are put in the starter hive should be kept in the shade or some cool place. The screens on the sides provide an abundance of ventilation.
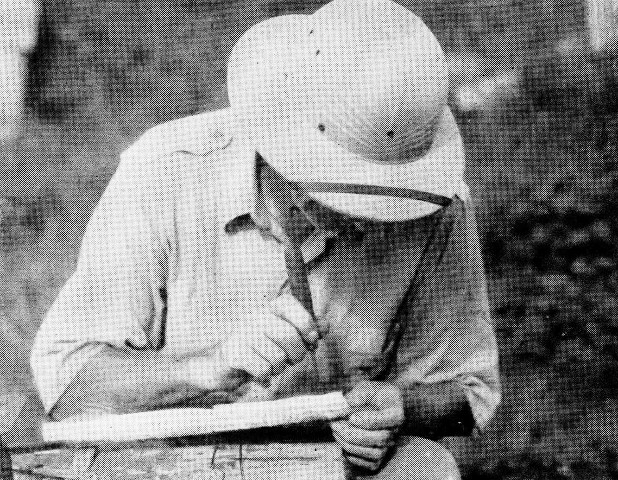
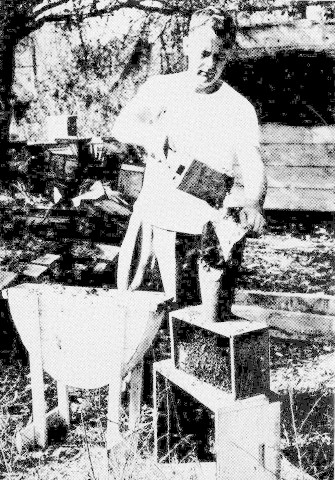
Getting the Bees with Which to Stock the Starter Hive
The colonies are all in two stories with queen excluders between the two hives. The queens are confined below and the top story is kept will filled with brood. All that is necessary to do in filling the starter hive is simply to shake in the bees from the top story. The bees will be depleted somewhat, as some are used to keep up the strength of the breeder hive and the finishers, so unsealed brood should be given to these colonies from other colonies. We use the bees from each colony once in every four days. This is less work than it would be to use a larger number.
Cutting the comb into strips
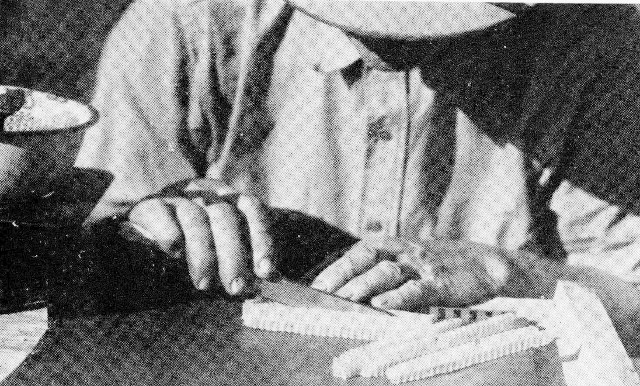
Preparing the Cells
Let us now consider the larvae in the breeder hive is ready for use. First some wax should be melted. An electric hot plate or a sterno stove with canned heat may be used.
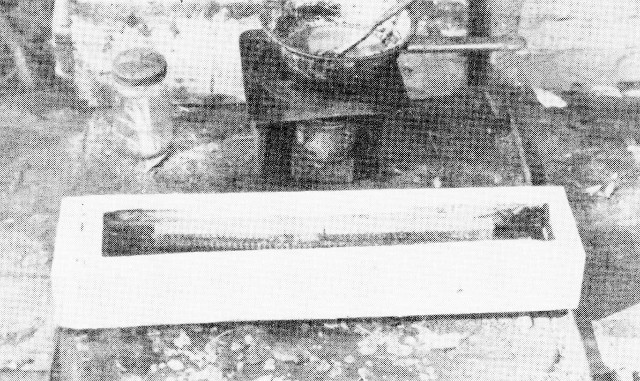
The comb from the breeder hive is now cut into strips one cell wide. With a small paint brush, wax is painted on the cell bar and the strips of cells placed on the waxed bar. Then with the brush wax is painted on the sides of the cell strips. The cells are then cooled in the wooden tank and more wax painted on till both sides of the strip of cells have enough wax to make the cells strong enough so they will not mash down when inserting the spike. Wax should be cool for painting the cells, nearly ready to solidify. We use a wooden tank four inches (10cm) wide inside measurement, and half an inch (1cm) longer than the cell bars. A cleat is tacked in one end under which the end of the cell bar is placed. At the other end of the tank is a nail driven through from the side extending about two inches (5cm) into the box. As soon as the cells are waxed the bar is shoved under the wooden cleat at one end of the tank and the other end is placed under the nail at the other end. Then cold water is poured in the tank till it covers the melted wax. It is well to put ice cubes in the water for we want the cells to be firm so the larvae in the cells can be destroyed without mashing down the comb. While we prepare the cells as quickly as possible in order that they may be in care of the bees without delay, it has been astonishing to note what gluttons for punishment these well-fed larvae are. Frequently we have more cells that we have use for so instead of using the larvae, we set the comb aside for the larvae to die in order that we may use the comb again. Often after four days, when we give the comb to the bees in the breeder hive, some of the larvae will be rejuvenated or resuscitated, or whatever you wish to call it. An interesting feature is that although the larvae were away from the bees four days, they had not increased in size a single bit. This shows that larvae away from bees do not grow, so we should keep them away from the bees as short a time as possible.
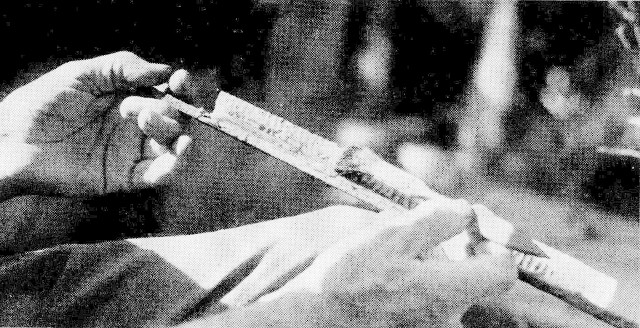
Painting the cells
It will be necessary to destroy some of the larvae in the cells in order to make room for the queen cells. We have tried many methods but find the best way to destroy the larvae is to insert a spike in the cells and punch out the bottoms. An ice pick may be used if the point is broken off. We usually destroy two cells and leave one which gives plenty of room for the fine large queen cells. Sometimes when we are short of cells we destroy every other one. Some will be built close together and will be destroyed in cutting but one can get more cells in this way.
Destroying the larvae
Putting the Prepared Cells Into the Starter Hive
We use two bars in each frame, the space above and below the bars being filled out with wood. The starter hive is given a little jar on the ground so the bees will fall to the bottom and not fly out. The two frames of cells are set in place, the comb containing thin honey being in the middle. Cells will be built better in the middle of the combs as shown, for where the cells are near the top of the frame the bees are apt to build comb over them.
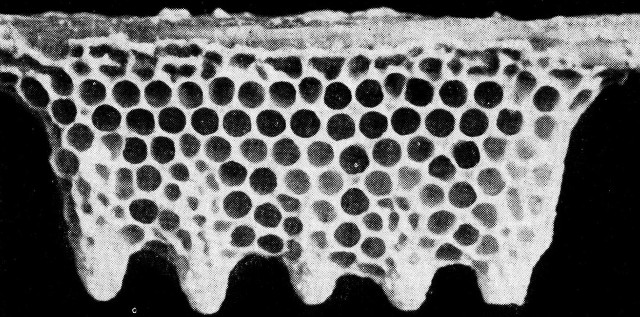
Program of These Rejoicing Bees
Now what is the first thing the bees do upon receiving these prepared cells? They first unload the accumulated milk in their glands by feeding the larvae. Next, they begin tearing down the walls of the worker cells. It has been stated by many that the bees enlarge the worker cells. This they can not do. They tear down the worker cells and build queen cells over the larvae. In this way they build the cells as they want them and do not have to put up with any man-made contraptions. The photographs will show how bees build their cells.
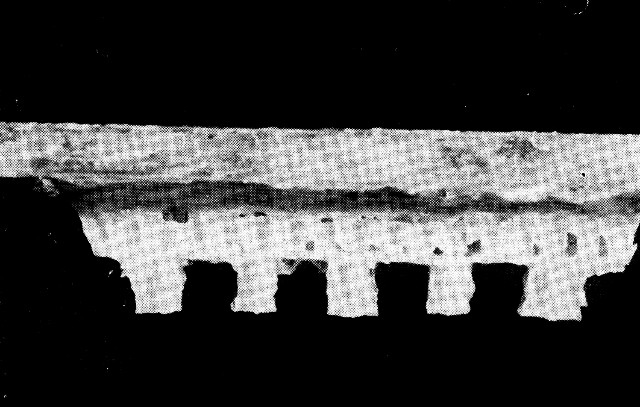
Cut #1 shows the cells as we prepared them especially for this picture. We bent the sides of the cells over to destroy the larvae in them leaving one cell and destroying two.

Cut#2 shows how the bees have torn down the worker cells and have started to rebuild. One cell at the right has already begun to take shape. This photo was taken only four hours after the cells were given to the bees. I had intended to take more pictures four hours later but darkness come on, so number three was taken the next morning and, as can be seen, the bees are rushing the work along at top speed. Note what a fine start they have and yet the larvae in these cells are no larger than those usually used for grafting.

The next picture was taken 24 hours after the last one and now the bees have fully half an inch (13mm) of bee milk stored in each cell.
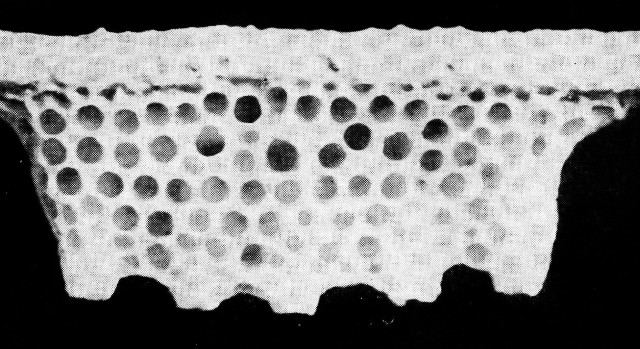
The fifth picture was taken 24 hours after the previous one and, as may be seen all the cells are capped over except the one at the right and it was capped over two hours later.
When starting cells from worker cells the bees first "raze" them and then "raise" them. This reminds me of an incident that happened years ago. I told my wife that a virgin had gotten into the hive where I had a lot of queen cells and this virgin was razing cells. She thought I said the virgin was "raising hell" so I let it go at that for I rather liked her version of the incident.
Finishing the Cells
While the bees are now busily engaged in remodeling the cells, we must prepare to have them finished, for they should not remain in the starter hive more than 24 hours for the best results. Again I shall tell what we do and then tell why we do it. The best colony for finishing cells is a strong queenless colony. The cut shows cells made by the grafting system illustrated in that excellent little book by Walter Kelly, How to Grow Queens for Fifteen Cents. Also is shown the use of wooden cell cups.
The queenless colony that is to finish the cells must contain at least five pounds (2kg) of bees and several combs of mostly capped brood. If no nectar is coming in, this colony must be fed liberally. Again, to be extra conservative, we have two colonies to finish the cells that have been started. If this is properly done you can produce cells every bit as good as those built by the bees during swarming. Bees must be added to keep up their strength. It is some help to them by giving them the cells with the bees that are with the cells. When more bees are needed the starter hive is dumped in front of the finishing hive.
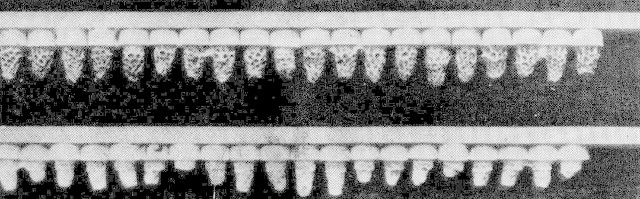
We use a single story to finish the cells unless there is a heavy honey flow on, in which case we add a second hive body but have the cells finished in the bottom hive. If we start four bars of cells in the starter hive it is best to give them to two finishing colonies. As the bees finish a job that has been started we must be very particular to see to it that they are in the best possible condition to finish the cells properly. In case we wish to start cells every day we have three sets of finishers, two hives in each set. In case one is rearing queens on a very extensive scale he can have four hives or more in each group and use two or more starter hives. After the cells have been in the starter hive overnight we lift out the frames of cells and give one to each of the finishers. The adhering bees are given to the finishers which helps keep up their strength. The frame of brood and cells are arranged as follows: At the side of the hive nearest to you is a frame of capped brood, then a frame of cells. Next day, group number two are given bars of cells, then next day group number three are given two bars of cells. Now, when you start the fourth batch of cells, the ones in the first group are sealed or nearly so and are given bars of cells, a frame of capped brood separating them from the first frames given. This is repeated till all finishers have three frames of cells each. When ready to give the next frames of cells, those first given now are what is known as "ripe cells." They must be taken out to make room for the next frames, and are ready to be introduced to mating hives. These cells will hatch the following day.
The photograph on page 60 shows the arrangement of frames of cells as they are painted white that they may be easily seen. From this on, when a frame of ripe cells is taken out another frame with started cells is given and this may be continued throughout the season. As the bees in the finishers become weak more bees must be added from the starter hive and capped brood given from other colonies. In case you do not need so many cells you can skip a day and the space in the finisher is filled by moving the combs over and should there be a honey flow an extra comb should be given to prevent the bees from building combs in the space.

Three frames of cells
Caution
Three or four days after giving brood you should look over the frames to remove any cells that may have been started. It is astonishing to note how many accidents can happen in those finishers no matter how careful one may be. We tack a zinc queen excluder to the bottom of the finishers to keep out virgins for if there is any place one can get in is sure to do so. By making the hives bee-tight and by examining the brood carefully you will have no accidents, or rather I should say, few.
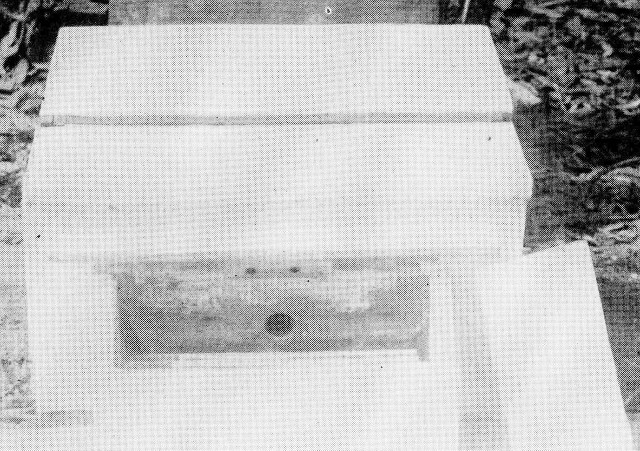
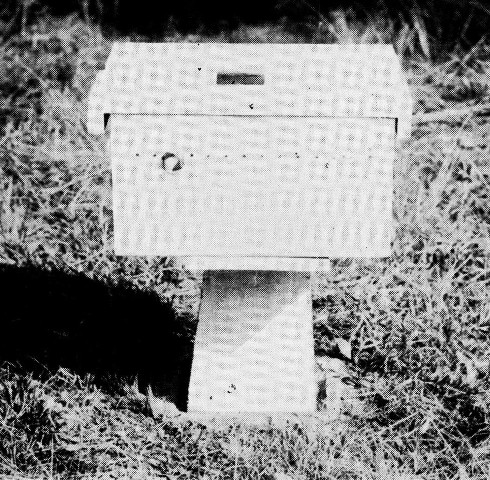
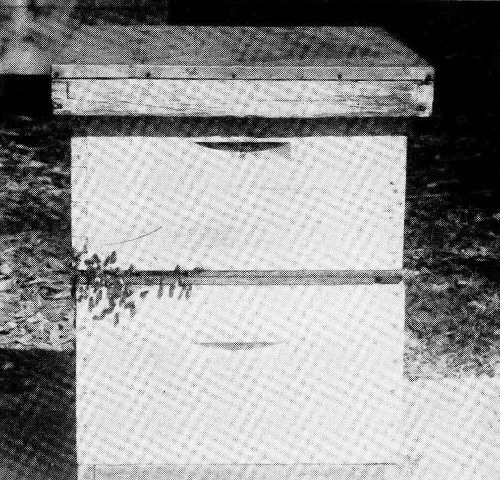
The Adolescent Mating Hive
The most successful small hive I ever used is what I term my adolescent hive. It is larger than the baby hive. It is made to hold three frames 5 x 8 inches (13 x 20cm). It is made of full three-fourths inch (19mm) material and the cover is made of 2-inch material material ("2-inch material" is actually 1.5" which is 38mm)..
The Adolescent hive with ventilated box on top
A small mating hive should not have a ventilator, as the air will blow in through it and cause the bees to realize their weakness and they will abscond. For an entrance a half-inch hole (13mm) is made in the center of the hive. This hole is slanted upward to keep out the rain. If the entrance is placed at the bottom, the ants or robber bees will kill out the bees if they get weak.
When feeding, a battery filler can be used and a little food may be squirted into the entrance at night. A package box which is used for bringing bees from the outyard is made with wire screen sides as shown in the cut. Half a pound of bees will nicely stock this hive. A little feed is given, a ripe cell is placed between the combs, and the package box is placed on top. The entrance should be kept closed for 24 hours if the bees are taken from the outyard. If taken from the home yard the bees should be confined 48 hours, or many will return to their former colonies.
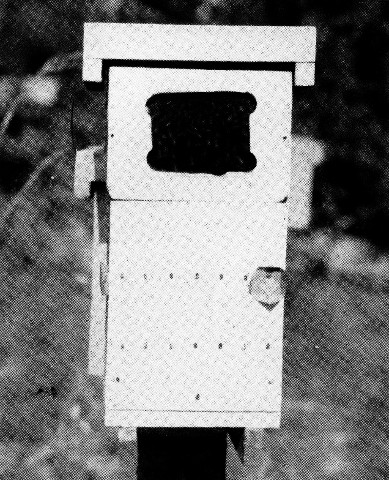
Our five frame mating hive
After confining them for the required time, the entrance is opened and the package box removed. To those who prefer a small hive this is by far the best of anything I ever tried. Even this hive requires close attention to see that it is kept in the right condition. We have wintered queens in such hives here in Florida but the results were rather uncertain so we have adopted a larger mating hive, one holding five standard frames. These hives are placed on concrete standards, two hives on each standard. The covers are made of one-and-one-half inch (38mm) material. This cover keeps them warm in the winter and cool in the summer. They are heavy enough so no wind will blow them off. At first we formed them in spring. This weakened the colonies in the outyard to such an extent that they gathered no honey. Now we form the mating hives in the fall after the honey flow is over. We proceed as follows: As the bees in the outyard must be requeened, we take a package of one and one-half pounds (680gm) of bees and the old queen. The bees and queen are put into the mating hive. As they have a queen it is not necessary to confine them if they are put in after dark. A young queen is introduced into the colony from which the package was taken. With a young queen, the colony soon makes up for the loss of the bees. After the old queen in the mating hive has been laying for a week or so she is removed and a ripe cell given. With this management, the colonies in the outyard are actually benefited. As we winter the colonies in the mating hives there will not be many to establish in the fall, only the ones that have run down for one reason or another. Some mating hive colonies may be too weak for wintering. In such cases a package with queen is put in the same as though the hive was empty. When there is no honey flow, our five-frame hive requires more feed than the smaller one. On the other hand the bees in our larger hive will gather more honey and therefore need less feed. While rearing queens we have but four frames in the hive as it is much more convenient to handle the frames. After queen rearing is over in the fall, an extra frame of honey is put in. A few may die out in the winter for one reason or another, but the rest will be so strong that they may be divided to make up the loss. When introducing cells, when no honey is coming in, we feed the night before giving the cells. Should any be short of stores, they are given an extra amount of feed. The entrance to this hive is in the center of the front. It is one and one half inches (38mm) in diameter and the hole is slanted upward to keep out the rain.
Introducing the Cells
In introducing cells no protectors are used but we simply press the cells lightly against the combs, placing them near brood as the bees will care for them better.
Stocking the Mating Hives
In stocking the mating hives it is best to take them from an outyard as they do not have to be confined so long. We do not weigh the bees but measure them instead. We have what we call our bee hopper. It is four and one half inches (11cm) wide. The bottom is covered with galvanized iron. A scoop is made just wide enough to reach across the inside of the hopper. For the five frame hives we use about a pound and a half (680gm) of bees.
Huber using the bee hopper
How Long Should the Bees be Confined to the Mating Hive?
In case bees are taken from the outyard they should be confined to the mating hive one day and released after dark the day following. In case bees are taken from hives in the home yard close to where they are to be established they should be confined two days and released after dark. Most of them will stay but a few will be gifted with remarkable memory and will go back, but there will not be enough to materially weaken the bees in the mating hives.
Mating Hive Records
One must have some system of knowing what the conditions are within the mating hives. We have used a number of systems and out of all of them we have worked out a system that gives such perfect satisfaction that we never expect to make a change. We need to know the conditions within the mating hive for a period of two weeks, for by that time the virgin should have been mated and by that time she is a laying queen. Therefore, we have a row of copper tacks across one side of the hive, 14 in number, one for each day of the week for two weeks. These tacks are driven about halfway in. The first tack at the left represents Monday. By putting a mark over Thursday's and Sunday's tacks, we can see at a glance what days we are working on. Tags are made of galvanized iron two inches (5cm) square. A square hole is made in the center of the tag. The corners are bent forward a little for easy handling. They are first dipped in yellow quick-drying enamel. After drying, each corner is dipped in enamel of the following colors. First black, then red then white, then blue reading to the left. Now let us consider the hive and it's signal relation to the queen. Let us say we introduced the first cell on Monday. The tag is placed on the tack at the extreme left and turned to red, indicating a cell has been given. We examine the hive Wednesday and if the virgin is there the tag is turned to white. Should the virgin not be there, the tag is turned back to black indicating the hive is queenless. When another cell is given, after the first one is not accepted, it is put in on Wednesday so the tag is moved to the third position and turned to red. This process is continued throughout the season. A picture of our mating hive has already been given. To indicate the condition within the hive we have blocks four inches (10cm) long painted black so they may be seen at a distance. A number of these blocks are distributed among the hives, being placed on the stands between the hives. In case the hive can spare honey the block is placed lengthwise of the hive at the extreme left. If it needs honey it is placed crosswise in the same position. The block shown in the cut shows the hive can spare both brood and honey. If placed crosswise at the extreme right it indicates that the hive needs brood. If placed lengthwise on the same position it indicates the hive can spare brood.
Bee Candy
Candy for the introducing cage or for mailing cages is made by mixing XXXX powdered sugar with honey. This should be kneaded as stiff as possible. If the honey is heated it will absorb more sugar. If one has bee disease, or is unable to get a health certificate before shipping, candy may be made of invert sugar and such candy is nearly as good as that made with honey. To make invert sugar, put half a pound of water in a kettle and let it come to a boil. Then add one pound of granulated sugar and stir in one-fourth teaspoon of tartaric acid and boil till a temperature of 248° F (120° C) is reached. A candy thermometer is necessary for this. No certificate of health is required by the postal authorities when using invert sugar candy. All that is necessary is a statement that there is no honey in the cage. After the invert sugar is cooled it is used the same as honey in making bee candy.
Shipping Queens
Our experience has taught us that the reason so many queens die in the mail is lack of ventilation or because they are overheated. We have found that by wrapping the cages in cloth, they go through in good condition if they are not too long on the road. We also ship in mailing tubes which give even better ventilation. Shipments made with mailing tubes have gone to 43 foreign countries by air with almost no loss.
A Review
As we thought it necessary to do a lot of explaining as we went along, we will now give the procedure step by step:
1. Stock the breeder hive as described, putting queen and one frame of brood and the two wood-comb frames in the back compartment, putting the frame of brood in the center.
2. Prepare as many colonies as are needed by putting them in two story hives with brood above the queen excluder and the queen below.
3. Cut Modified Dadant foundation in four pieces and put them in frames and get this foundation drawn in any colony suitable.
4. Take out the frame of brood from the back compartment of the breeder hive and put it on the other side of the partition, being sure the queen is in the back compartment. Then put in a frame of the drawn foundation. Leave it there for 24 hours, then put it on the other side of the partition. In case you wish to start cells every day, put in another frame of drawn foundation in the back compartment. Repeat this every day until the fourth comb is placed the other side of the partition, when the first is ready for use.
5. Put three frames of honey and pollen in the starter hive and put some thin syrup or diluted honey in the middle comb. Then shake in bees in the amount of five or six pounds (2.25 to 2.75kg) from the hives previously prepared. Leave them three or four hours.
6. Take out frame of young larvae and cut into strips, mount them on bars and give them to the bees in the starter hive.
7. Next day remove the queen from two colonies to be used as cell finishers and give to each colony one frame of cells and dump the starter hive in front of the colonies from which the bees were taken.
8. When all finishing colonies have three frames of cells each, and the fourth is ready, remove the first given and introduce the cells to mating hives.
Starting Cells Every Third Day
In starting cells every third day, but two finishing colonies will be needed. In this case you put in a new comb in the breeder hive every third day and when it is placed the other side of the partition, an old comb or a frame of brood is placed in the back compartment between the two wood-combs. There are both advantages and disadvantages in starting cells every third day instead of every day. We are running more to the third-day plan. One advantage it has is that the drawn sheet of foundation may be left for the queen to lay in longer. Another is that as cells are introduced every third day, in introducing the cells, the ones introduced three days before can be examined. If using the third-day system, in order to keep the record straight, one should write down on a piece of paper the letters C S I, C S I in rotation, these letters being placed at the left hand of the paper, one below the other down the paper. C stands for comb and indicates that you gave a new comb to the queen in the breeder hive. S means that you start cells, and I means you introduce cells. Put the date and the day of the week after each letter. Of course in starting there will be no cells to start or introduce, but after some time the letters will have a meaning. In case one started cells regularly every third day there would be little use for the above memorandum as the condition of the cells in the finishing colonies would indicate what is to come next. However, in case you slipped one starting, all cells would look much alike and you might get things mixed up. At any rate I have done so and when I came to giving the started cells to the finishers I found the hive full of virgins!
Modifications for the Small Beekeeper
For the commercial queen breeder, or for the honey producer who wishes to rear 200 queens or more I strongly recommend the management and equipment that have been described. For the small beekeeper, or the back-lotter who wishes to rear a dozen or maybe 50 queens in a year, no special equipment will be necessary. Under such circumstances it is best to rear queens during a honey flow as conditions are more favorable and queen rearing is a simple matter compared to rearing them when there is no flow. When the honey flow is just beginning is the best time to start as there is an abundance of pollen coming in along with the nectar, and pollen is just as necessary as nectar.
For starting cells, first get the foundation drawn as described. Next set to the rear the hive containing your breeder, with the entrance in the opposite direction from the original position. In its place put another hive and in it put two frames solid with honey and pollen. Shake in half of the bees from the breeder hive and put the breeding queen into the prepared hive. Within 24 hours she will have a good patch of eggs in the new comb. The comb should be placed over an excluder on a strong colony. In case you do not wish to start more cells immediately, this hive with the two combs and the one with the eggs may be set over the hive formerly containing the breeder, setting this hive on its former stand. The two hives must be separated with an excluder, with the queen in the bottom hive. This colony must be well fed for we want the larvae that will soon come from the eggs to be well fed. As soon as the eggs hatch, turn a strong colony to the rear and in its place set a hive into which you put two frames of honey and pollen then shake out half of the bees from the hive you have moved into the hive with the two combs. In case the colony is not of sufficient strength, two colonies may be set to the rear and half of the bees from both colonies shaken in. Next cut the comb into strips as has been described and give a frame of two bars of prepared cells for this colony to both start and finish. In case one prefers to use a starter hive, one can be made by merely tacking a screen to the bottom of a hive. If this is done the hive should be set on blocks high enough to afford plenty of ventilation.
Mating Hives for the Small Beekeeper
In case increase is desired a hive may be moved to a new location and another hive set in its place. Into this hive put two or three frames of brood with adhering bees from the hive moved, being careful not to get the queen. It is well to wait two or three days after dividing this colony before giving a cell for bees will keep returning from the hive moved and are apt to destroy the cell given. As soon as the queen has mated and laying, the hive should be filled out with combs or frames of foundation or starters. In case feeding is necessary a good way to feed is to tip the hive back a little and under the front place a block. Then at night pour in a little syrup. Be careful not to put in more feed than the bees will consume during the night for if any syrup is left it will incite robbers as a bottom board feeder is the worst of any feeder to cause robbing.
Mating Queens in an Upper Story
In case one does not wish to make increase, a good way to mate queens is in an upper story of a two-story hive. A frame covered with wire screen should separate the two hives. Always use a wire screen and never a queen excluder. Some in the past have advocated using a queen excluder but in the great majority of cases the bees will kill the virgin as soon as she emerges. In the frame of the wire screen an opening of half an inch (13mm) should be made for a flight hole. This entrance should be to the rear of the hive below or the queen in returning from her mating flight is apt to get into the hive below.
Hive with rear entrance
The entrance to the top hive should be closed for two days, otherwise too many bees will join the colony below. Syrup or honey should be put into one of the combs and a ripe cell given. After two days the entrance should be opened and the virgin will soon fly out and mate. When the honey flow permits, this is an excellent way to requeen the colony for we have two laying queens instead of having it queenless while introducing a queen or cell. The bees in the top hive will not suffocate from having the entrance closed for the screen will afford abundant ventilation. The best way to put syrup into the combs is with the use of a pepper box feeder. That is a mason jar with the cap full of holes. With this the syrup may be shaken into the combs. If you merely want to requeen, all that is necessary is to hunt up the old queen below and remove her and take out the screen. The bees will not fight as they have kept up their acquaintance through the screen. In case increase is desired, just move the bottom hive to a new location and set the top hive on the old stand. The lower hive should be moved as it is much stronger than the top hive. The bees for a time will try to get into the back of the hive but after a time they will make a chain around to the front door and all will be well.
Requeening by Giving a Ripe Cell
As a rule we do not recommend giving a ripe cell to a full colony, as it weakens the colony by being deprived of a laying queen for nearly two weeks. Again, a strong colony does not accept a cell as readily as a weaker one, and if the cell is not accepted it will further weaken the colony. However, when the honey flow is over and more bees are not needed immediately, it is often desirable to requeen by giving a ripe cell. As it is difficult to find a virgin in a strong colony, one may give a cell and without looking for the virgin another cell is given three days later. In a week after the first cell is given, the colony may be examined and if there are no queen cells started, you may know a virgin is present. In case both cells are destroyed, or should the virgin be lost in mating, it is best to introduce a laying queen as the colony would become too weak if given another cell.
_________________________
The original book is in the public domiain. This arrangement of the book Copyright 2004 by Michael Bush